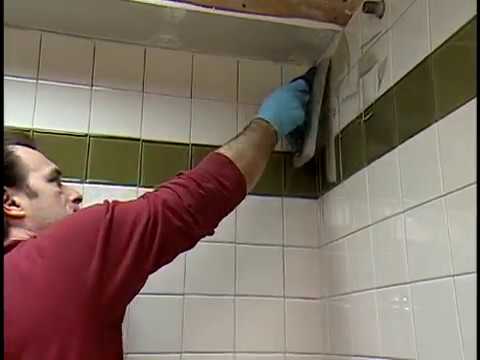
[WPXperVideo id=9 ]The three walls surrounding a shower and bathtub require more than a traditional wallboard surface because of the constant wet and damp conditions. Ceramic wall tile is a great choice. It’s tough, easy to clean and it can stand up to all the wetness of busy shower receives. Ceramic tile can be installed directly over wall board plaster or existing tile but it must be attached to a surface that’s structurally strong enough to support the tile.
In this demonstration we’ll be installing backer board which most tile manufacturers recommend. Before you start protect the inside of the tub with cardboard. Start by sealing the edges of the tub flange with asphalt roofing cement this will seal the tub to the waterproof felt or polyethylene plastic we’ll be attaching. Next staple 15-pound felt to the studs. Embed the bottom layer into the asphalt cement on the tub flange. Overlap the second layer of felt at least two inches over the top of the first layer. Use only enough staples to hold the felt in place. If you’re covering an outside wall use four mil polyethylene plastic instead of felt to prevent moisture problems. Once all the felt or plastic is attached place quarter-inch shims along the top of the tub the gap will prevent water on the rim of the tub from wicking up behind the backer board. Fasten cement backer board sheets to the studs using backer board screws. Use fiberglass tape to reinforce the corners and joint, then use thin set mortar to skim and level them. Finally seal the gap where the backer board meets the tub with a clear or white silicone this will allow the tub to expand and contract slightly before you start working with the tile.
Determine its actual size. Place 10 tiles side-by-side and measure the length of the rope divide by ten and use a resulting number as the tile dimension for your layout. Measure the height of the back wall from the top of the tub to the ceiling for wherever the top row of tiles will be. Calculate and mark the horizontal midpoint of the wall. Measure from the height of the back wall again and divide by the size of the tile you’re using. If you end up with less than a full tile as your remainder, shift the mid height line up by that amount. This will give you a row of full tiles along the top of the tub and a row of partial tiles at the top of the wall. Draw a new mid height line and extend it to all three walls make sure it’s level. Now measure the width of the back wall and mark the mid width point using a level extend the line to the floor measure from the mid width point to either corner and divide by the size of the tile. If the end tiles will be less than a half tile wide shift the mid point so the tiles on both ends will be of equal width and draw a new mid width line. Repeat this process for the other two walls using a chalk line. Snap additional vertical and horizontal lines to create a grid of eight to twelve square foot rectangles on the walls. Once this is done you’re ready to start tiling.
Start by fastening a level one by two or one by three wooden batten just below the mid height line double check to make sure it’s level. The batten will keep your first row of tiles straight which will make the rest of the tiles on the wall straight as well. Make sure latex modified thinset mortar as instructed in the technique section of tiling one two three. Using a square notched trowel, apply mortar to one of the marked grids along the top of the batten and comb it into straight vertical ridges. Press the first few full tiles in place above the baton use a slight twisting motion to be sure it makes good contact with the mortar. Do not slide the tiles. After you’ve done three or four tiles lift one off and check the back. The mortar should cover the entire surface. If the trowel ridges on the wall aren’t thick enough scrape the mortar off the wall and reapply it using a trowel with a larger notch. Work up and out in a stair step pattern, take your time and work on the wall in manageable 8 to 12 square foot sections. Mark out and set the tiles around the shower arm. Set any top or end tiles that must be cut last. If any mortar uses up between the tiles while you’re working clean it up before it dries.
Continue up the wall finishing with the row of cap tiles. Once you’re done let the mortar cure for at least 12 hours then remove the batten. Working from the middle out and down set the rest of the tiles to keep the tiles from sliding down support each with a piece of masking tape attached to the tile above it. Let them dry completely. Each type of mortar has a different curing time. Be sure to follow the manufacturer’s instructions. After the mortar has dried, set any accessories in place use masking tape to support it until the mortar has cured. Do not install a tray with a towel bar that might be mistaken for a handhold.
Grouting is the next step in the tiling process. Grout is the material that fills the space between the tiles and supports them almost like glue. Grouting is messy so be sure you properly cover any areas that you don’t want to get dirty before you start. Remove any excess mortar with a razor blade. Using a margin trowel mix the powdered grout with liquid and apply it as recommended in the technique section. Skim the excess grout off with the edge of the float to avoid digging into the joints. Move the float diagonally across the tiles. The grout will set up in about 5 to 15 minutes and have a putty-like consistency. When a thumbnail pressed against it doesn’t leave an impression the grout is hard enough for the final cleanup. With a damp sponge wipe the tiles diagonally to clean them, rinse the sponge frequently in clean water. Remove any remaining haze and repeat this process until the tile is as reflective as glass. cure the grout as instructed in a technique section of Tiling 1 2 3 and let it set thoroughly before applying sealer.
The curing process is very important. Do not disturb it once the grout has cured. Apply sealer with a sponge. Ceiling tile grout gives it a greater water and mildew resistance and helps keep it from getting dirty. Make sure to wipe off any excess within 10 minutes. Don’t let it dry on the tile and if you’re using an unglazed tile seal it as well. Finally caulk the tub and tile joint with a bath and tub caulk. Use a colour that matches either the tub or the tile. To smooth the bead use a wet finger or sponge and lightly draw it across the caulk.


Leave a Reply